![]()
Bernie
UT, US,
Reviews
Comments
Wish Lists
Alias:
Bernie
About:
- Nothing entered yet -
Occupation:
- Nothing entered yet -
Favorite Quote:
- Nothing entered yet -
Member Since:
07.19.2010
Bike 1:
- No Bike 1 -
Bike 2:
- No Bike 2 -
Bike 3:
- No Bike 3 -
Bernie has not yet written any comments.
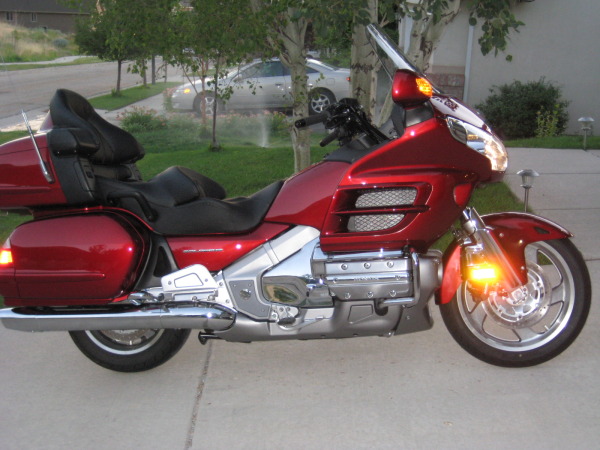
Adapter for LED Mirror, Front Reflector, Stealth Lights
ITEM CODE: KU7300, SKU: KU7300
08.05.2010
5 Stars
|
These adapters are A MUST HAVE/BUY for anyone wanting to add powered accessories to their 2006+ bikes! You just have to flip your mirrors forward, peel the rubber dust-boots back, disconnect the stock male-female adapters, then plug them in! From there, you connect Kuryakyn's splitter(s), provided with the accessory/ies purchased! What's really nice, the splitters can be daisy-chained together if/when you need more connections! AS A SIDE NOTE: The splitters can be run behind the front-outside corners on each side, into the pockets for easy connectivity of multiple components. I used these adapters to connect many LED accessories on my bike. Please look it up & provide feedback :) |
Clutch/Brake Or Round Handlebar Drink Holder w/Basket
ITEM CODE: PG27629
07.30.2010
4 Stars
|
I bought the clutch/brake mounted model. I mounted the holder on the clutch-side(LEFT). I WON'T LET ANYTHING block my Throttle/Brake hand! BE SMART FOLKS! We can rocket-off or grind to a halt without the clutch! THINK SAFETY FIRST! This holder is BIG in circumference! It will handle pretty much anything you throw at it except for a bucket! Big cups, bottles, whatever! IT DOES BLOCK 'UNOBSTRUCTED ACCESS' TO THE BIKE'S DASH! It'll take a few times riding with it to get used to. You need to get used to moving your arm lower/below it, to get to the bike's controls, etc. For me, unless I'm riding way in-the-clear of traffic, the 'console' doesn't count anyway! They're frills ONLY! Take a drive in Utah, you'll see what I mean!!! The lines in the roads confuse Mormons... A WISER DESIGN FOR KURYAKYN would be for Kuryakyn to provide a 90-degree chrome 'Elbow' mount (fully reversible for left/right). This would extend the holder as it currently does, and make it 'jackknife' towards the open/unused areas of the rider's access area (due to the mounting-point), keeping things unobstructed. |
ITEM: KU1367
07.30.2010
5 Stars
|
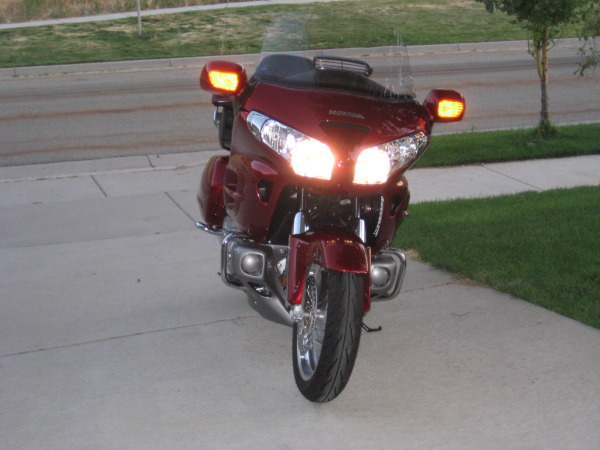
This is another QUALITY product by Kuryakyn! 1. Looks great, bright amber LEDs that are VISIBLE IN DAYLIGHT, high-quality construction! 2. Instructions, as usual, could use more detail. 3. Involved wiring, but easy install on 2010 GW-just take your time & be patient! There's no information provided on how to align the trim onto the faring! The 3M tape is the best 3M makes, and it won't let go once it touches any surface! I had clear-bra installed on my bike a few days before, so it was double-jeapordy! The tape would pull the clear-bra off. MOUNTING SUGGESTION!: 1. Pull back the mirror boots & install the adapters (SOLD SEPARATELY-BUY THEM for 2006+ bikes!), y-splitters, etc. Take care of all wiring details first!!! 2. Re-seat the boots completely, before attempting to mount (stick) the trim onto the faring! 3. Connect the power adapters on the trim to the splitters & route the wires exactly like you want them so they won't show. The wires should be run at the corner between the boot & windshield's rubber trim 'invisibly', covered by the 2x 'extensions' on the trim. 4. The trim has an 'extension' on each side that covers the wires. Each should over-lap the side-mirror boot by about 1/8-inch on each side. 5. Align the trim's 'extensions' so that their upper-edges 'align' with the stock rubber windshield trim's lower edge on each side, and press-down to have the 3M tape make contact & seal. 6. Run your hands from the outside to the center of the trim, pressing the 3M tape against the faring. If you were careful initially, this will stick the trim perfectly centered onto the bike's faring. Once the trim is initially on, make sure to carefully apply good pressure along the entire trim's lower edge, ensuring there is NO GAP between the trim edge & bike faring. Repeat this a few times. I repeated this several times the 1st evening. I then had the bike sit in the sun to 'bake' the bugger on, pressing it into place even more. I have NO GAP between the trim & faring, which is the FINISHED look we want :) |
Bernie does not have any wish lists.